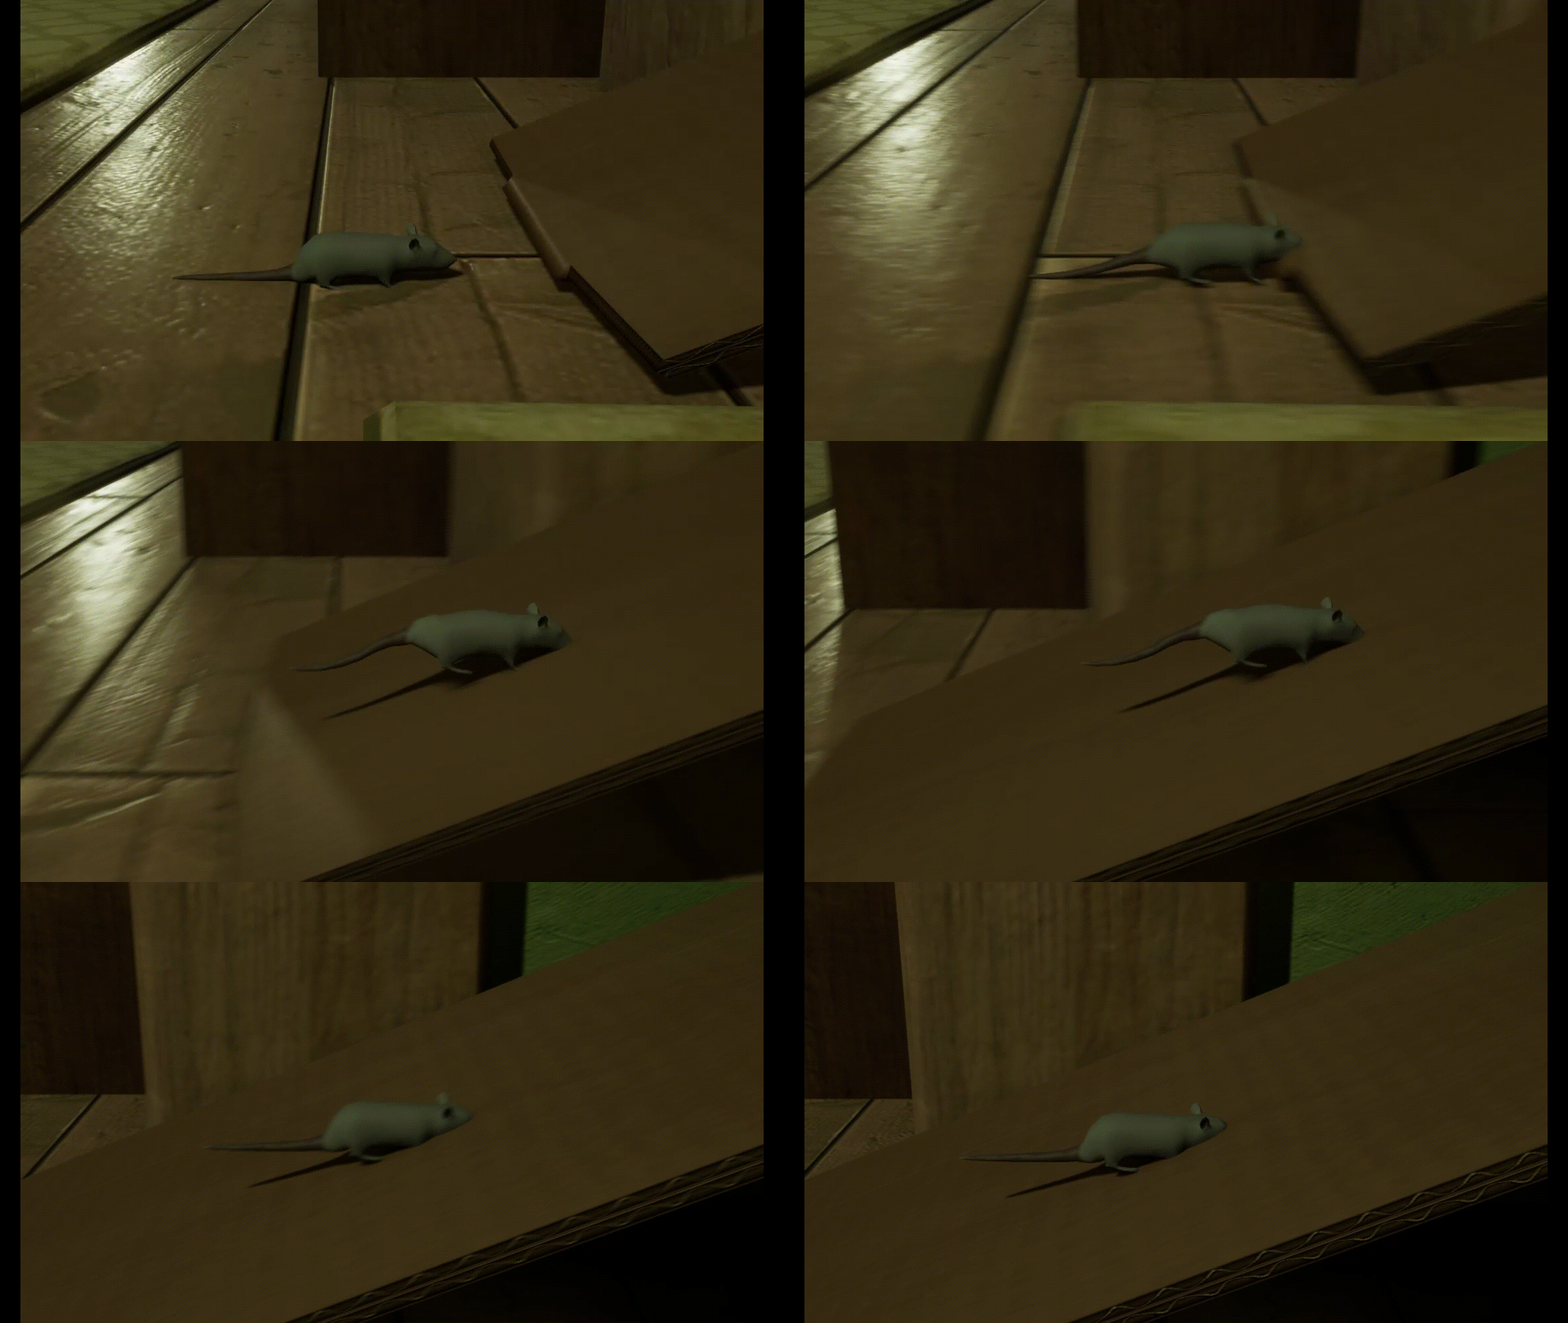
概要
この記事では、キャラクターを地面の傾きに合わせて傾ける処理を C++で実装する方法を紹介します。
Blueprint で実装したい方は、こちらの記事を参考にしてください。 UE4 地面の傾きに合わせてキャラクターを傾ける
環境
- Rider 2024.2.6
- Unreal Engine 5.4
参考資料
- https://www.youtube.com/watch?v=1ICBWJ7srxQ
- UE4 地面の傾きに合わせてキャラクターを傾ける
- クロス積: https://ja.wikipedia.org/wiki/%E3%82%AF%E3%83%AD%E3%82%B9%E7%A9%8D
- ドット積: https://ja.wikipedia.org/wiki/%E3%83%89%E3%83%83%E3%83%88%E7%A9%8D
- ロール、ピッチ、ヨー
本編
キャラクターが斜面を歩く際、傾きを合わせないとこのようになります。
 キャラクターの頭が斜面に埋まって、不自然に見えますね。
それでは、C++で実装していきます。
手順としては
- キャラクターの真下に向かってレイキャスト(線形判定)を行う
- レイキャストが地面(斜面)に当たったら、地面(斜面)の法線を取得する
- 取得した法線を利用して、地面(斜面)の傾きを計算する
- 地面(斜面)の傾きに応じてキャラクターを回転させる
プレイヤークラスにAlignFloor()関数を実装する
AlignFloor()はタイマーで 0.1 秒ごとに呼び出します(Tick で呼び出すこともできますが、最適化を考慮して 0.1 秒に設定します。見た目的には 0.1 秒の頻度で違和感は出ないと思います)。
PlayerCharacter.h1private:
2	void AlignFloor() const;
3
4	FTimerHandle AlignFloorTimerHandle;
PlayerCharacter.cpp1
2void APlayerCharacter::BeginPlay()
3{
4	Super::BeginPlay();
5
6	GetWorldTimerManager().SetTimer(AlignFloorTimerHandle, this, &APlayerCharacter::AlignFloor, 0.1f, true);
7}
8
9void APlayerCharacter::AlignFloor() const
10{
11	const FVector MeshLocation = GetMesh()->GetComponentLocation() + 1.f * FVector::UpVector;
12	const FVector MeshDownLocation = MeshLocation - 1000.f * FVector::UpVector;
13	FHitResult HitResult;
14	FCollisionQueryParams CollisionQueryParams;
15	CollisionQueryParams.AddIgnoredActor(this);
16	const bool IsHit = GetWorld()->LineTraceSingleByChannel(HitResult, MeshLocation, MeshDownLocation, ECC_WorldStatic,
17	                                                        CollisionQueryParams);
18	if (IsHit)
19	{
20		FVector FloorNormal = HitResult.ImpactNormal;
21		FVector RightVector = GetActorRightVector();
22		FVector UpVector = GetActorUpVector();
23		float SlopePitch;
24		float SlopeRoll;
25		UKismetMathLibrary::GetSlopeDegreeAngles(RightVector, FloorNormal, UpVector, SlopePitch, SlopeRoll);
26		SlopePitch = -SlopePitch;
27		const float MeshYaw = GetMesh()->GetComponentRotation().Yaw;
28		const float MeshPitch = GetMesh()->GetComponentRotation().Pitch;
29		const FRotator FloorRotation = FRotator(MeshPitch, MeshYaw, SlopePitch);
30		GetMesh()->SetWorldRotation(FloorRotation);
31	}
32}
これで地面の傾きに合わせてキャラクターを傾ける実装が完了しました!
解説
キャラクターの真下に向かってレイキャストを行う
PlayerCharacter.cpp1void APlayerCharacter::AlignFloor() const
2{
3	const FVector MeshLocation = GetMesh()->GetComponentLocation() + 1.f * FVector::UpVector;
4	const FVector MeshDownLocation = MeshLocation - 1000.f * FVector::UpVector;
5	FHitResult HitResult;
6	FCollisionQueryParams CollisionQueryParams;
7	CollisionQueryParams.AddIgnoredActor(this);
8	const bool IsHit = GetWorld()->LineTraceSingleByChannel(HitResult, MeshLocation, MeshDownLocation, ECC_WorldStatic,
9	                                                        CollisionQueryParams);
10	if (IsHit)
11	{
12		FVector FloorNormal = HitResult.ImpactNormal;
13		FVector RightVector = GetActorRightVector();
14		FVector UpVector = GetActorUpVector();
15		float SlopePitch;
16		float SlopeRoll;
17		UKismetMathLibrary::GetSlopeDegreeAngles(RightVector, FloorNormal, UpVector, SlopePitch, SlopeRoll);
18		SlopePitch = -SlopePitch;
19		const float MeshYaw = GetMesh()->GetComponentRotation().Yaw;
20		const float MeshPitch = GetMesh()->GetComponentRotation().Pitch;
21		const FRotator FloorRotation = FRotator(MeshPitch, MeshYaw, SlopePitch);
22		GetMesh()->SetWorldRotation(FloorRotation);
23	}
24}
この部分では、キャラクターのやや上方から真下に向かってレイキャスト判定を行っています。
const FVector MeshLocation = GetMesh()->GetComponentLocation() + 1.f * FVector::UpVector;
+ 1.f は地面との距離を確保するためです。そうしないとキャラクターが地面と同じ高さに位置し、レイキャストが正しく地面に当たらないことがあります(実際に自分の環境で発生しました)。
レイキャストが地面に当たったら、地面の法線(FloorNormal)を取得する
取得した法線を利用して地面の傾きを計算する
PlayerCharacter.cpp1void APlayerCharacter::AlignFloor() const
2{
3	const FVector MeshLocation = GetMesh()->GetComponentLocation() + 1.f * FVector::UpVector;
4	const FVector MeshDownLocation = MeshLocation - 1000.f * FVector::UpVector;
5	FHitResult HitResult;
6	FCollisionQueryParams CollisionQueryParams;
7	CollisionQueryParams.AddIgnoredActor(this);
8	const bool IsHit = GetWorld()->LineTraceSingleByChannel(HitResult, MeshLocation, MeshDownLocation, ECC_WorldStatic,
9	                                                        CollisionQueryParams);
10	if (IsHit)
11	{
12		FVector FloorNormal = HitResult.ImpactNormal;
13		FVector RightVector = GetActorRightVector();
14		FVector UpVector = GetActorUpVector();
15		float SlopePitch;
16		float SlopeRoll;
17		UKismetMathLibrary::GetSlopeDegreeAngles(RightVector, FloorNormal, UpVector, SlopePitch, SlopeRoll);
18		SlopePitch = -SlopePitch;
19		const float MeshYaw = GetMesh()->GetComponentRotation().Yaw;
20		const float MeshPitch = GetMesh()->GetComponentRotation().Pitch;
21		const FRotator FloorRotation = FRotator(MeshPitch, MeshYaw, SlopePitch);
22		GetMesh()->SetWorldRotation(FloorRotation);
23	}
24}
この数式の詳細について説明すると、少し数学的な内容が含まれますので、興味のある方のみ読んでください。興味がない方は次に進んでください。
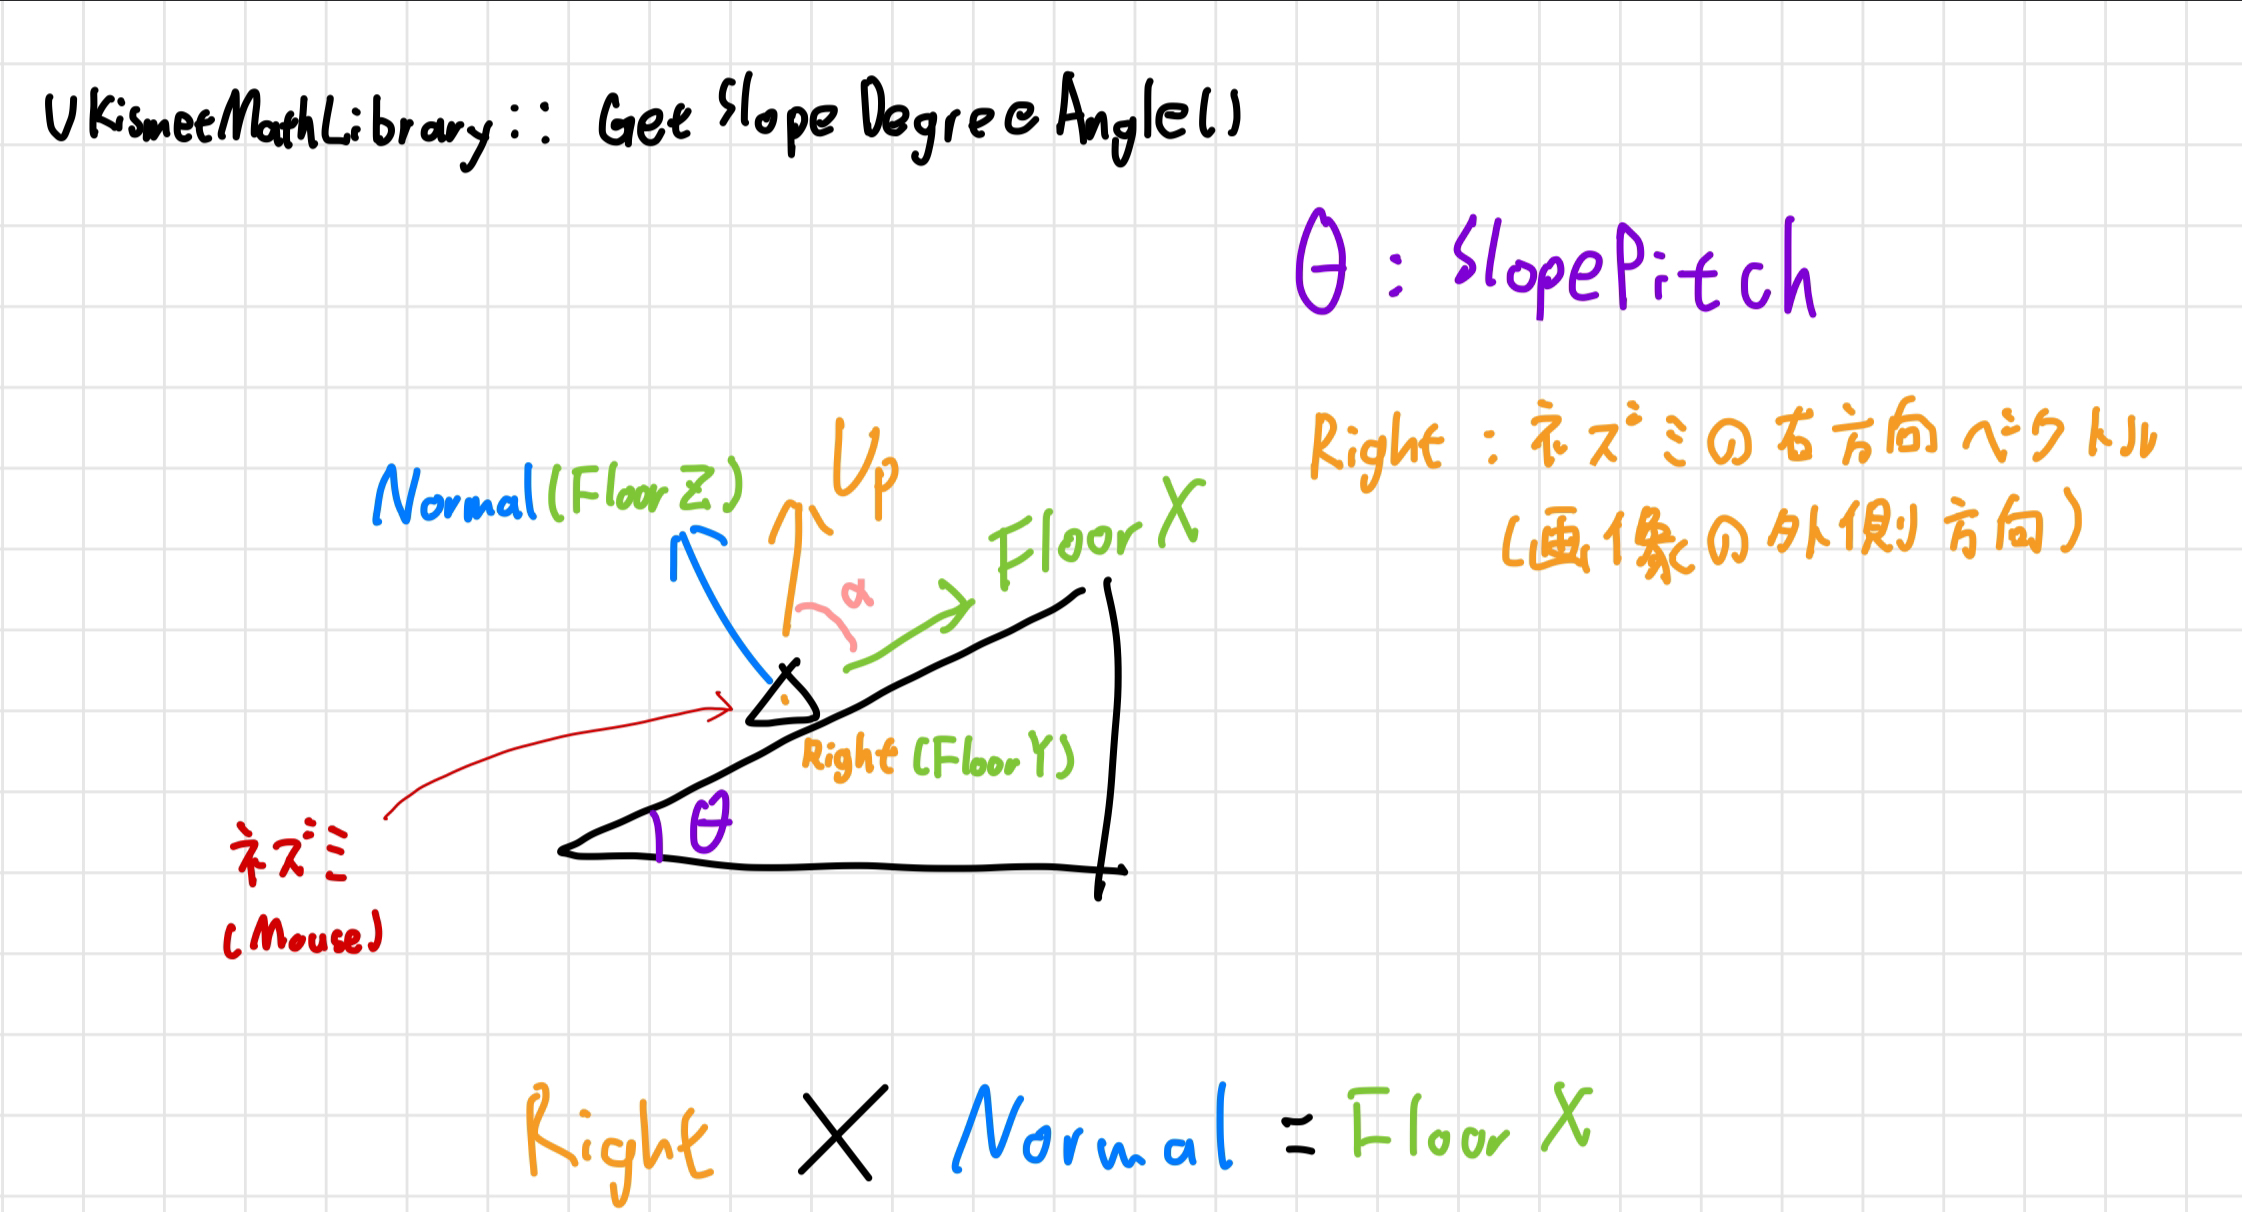
キャラクターがネズミだとして、ネズミが斜面に立っている状況を考えます。レイキャストが斜面に当たり、その法線を取得します。
地面(斜面)の法線を取得。
FVector FloorNormal = HitResult.ImpactNormal;
法線とは?
曲面上の一点で、その点での接平面に垂面な直線
傾斜角度の計算
キャラクターの右方向ベクトルと上方向ベクトルを取得します。
1		//...
2		FVector RightVector = GetActorRightVector();
3		FVector UpVector = GetActorUpVector();
4		//...
UKismetMathLibrary の関数を使用して、斜面の傾斜角度(SlopePitch)を取得します。
UKismetMathLibrary::GetSlopeDegreeAngles(RightVector, FloorNormal, UpVector, SlopePitch, SlopeRoll);
この関数の内部を確認すると、以下のような計算が行われています。
KismetMathLibary.cpp1void UKismetMathLibrary::GetSlopeDegreeAngles(const FVector& MyRightYAxis, const FVector& FloorNormal, const FVector& UpVector, float& OutSlopePitchDegreeAngle, float& OutSlopeRollDegreeAngle)
2{
3	const FVector FloorZAxis = FloorNormal;
4	const FVector FloorXAxis = MyRightYAxis ^ FloorZAxis;
5	const FVector FloorYAxis = FloorZAxis ^ FloorXAxis;
6
7	OutSlopePitchDegreeAngle = 90.f - FMath::RadiansToDegrees(FMath::Acos(FloorXAxis | UpVector));
8	OutSlopeRollDegreeAngle = 90.f - FMath::RadiansToDegrees(FMath::Acos(FloorYAxis | UpVector));
9}
図を使って説明すると、より理解しやすいかもしれません。
例えば、ネズミが斜面に立っているときの右側面図は以下のようになります。

△ 三角形はネズミです。
FloorZ は斜面の法線(法線ベクトル)です。FloorX はネズミの右方向ベクトルとFloorZ(法線ベクトル) のクロス積(Cross Product)で計算され、その結果、斜面の上り方向ベクトルになります 。
FVector でのキャレット(Caret)「^」はクロス積の演算子です
二つのベクトルのクロス積の結果は、それらのベクトルに垂直なベクトルです。
クロス積とは:https://ja.wikipedia.org/wiki/%E3%82%AF%E3%83%AD%E3%82%B9%E7%A9%8D
次に、FloorZ と FloorX のクロス積を計算すると、「ネズミの右方向ベクトル」が得られます。
const FVector FloorYAxis = FloorZAxis ^ FloorXAxis;
斜面の上り方向ベクトル(FloorX)とネズミの真上方向ベクトル(Up)のドット積(Dot Product)を計算し、その結果から Acos を取ることで角度 a が求められます。90 度からその角度を引くことで、斜面の傾斜角度(SlopePitch)が取得されます。
OutSlopePitchDegreeAngle = 90.f - FMath::RadiansToDegrees(FMath::Acos(FloorXAxis | UpVector));
FVector の「|」はドット積の演算子です
ドット積とは https://ja.wikipedia.org/wiki/%E3%83%89%E3%83%83%E3%83%88%E7%A9%8D
ドット積 ベクトル u と v の間の角度を θ とすると,次の式が成り立ちます u⋅v=∣u∣∣v∣cosθ
地面の傾きの量にキャラクターを回転させる
PlayerCharacter.cpp1void APlayerCharacter::AlignFloor() const
2{
3	const FVector MeshLocation = GetMesh()->GetComponentLocation() + 1.f * FVector::UpVector;
4	const FVector MeshDownLocation = MeshLocation - 1000.f * FVector::UpVector;
5	FHitResult HitResult;
6	FCollisionQueryParams CollisionQueryParams;
7	CollisionQueryParams.AddIgnoredActor(this);
8	const bool IsHit = GetWorld()->LineTraceSingleByChannel(HitResult, MeshLocation, MeshDownLocation, ECC_WorldStatic,
9	                                                        CollisionQueryParams);
10	if (IsHit)
11	{
12		FVector FloorNormal = HitResult.ImpactNormal;
13		FVector RightVector = GetActorRightVector();
14		FVector UpVector = GetActorUpVector();
15		float SlopePitch;
16		float SlopeRoll;
17		UKismetMathLibrary::GetSlopeDegreeAngles(RightVector, FloorNormal, UpVector, SlopePitch, SlopeRoll);
18		SlopePitch = -SlopePitch;
19		const float MeshYaw = GetMesh()->GetComponentRotation().Yaw;
20		const float MeshPitch = GetMesh()->GetComponentRotation().Pitch;
21		const FRotator FloorRotation = FRotator(MeshPitch, MeshYaw, SlopePitch);
22		GetMesh()->SetWorldRotation(FloorRotation);
23	}
24}
ネズミの Mesh のロール(Roll)を反対方向に回転させることで、斜面の傾きに自然に対応するようにキャラクターが回転します。
結果
キャラクターが正しく斜面に対応して動作している様子を以下の動画で確認できます。
最後に
この記事では、キャラクターを地面の傾斜に合わせて回転させる方法を解説しました。もし誤りがあれば、ぜひコメントでお知らせください。